DIY – How to install a UHF radio into your 4×4
10 quick and easy DIY tips to help you get the job done at home
Last Updated: 7 March 2025
Advertisement
Installing a UHF radio into your own four-wheel drive is a task that I’d absolutely recommend to anyone. As long as you can use a soldering iron. It’s the perfect DIY task really, which will save you some money to use for other mods, by not having to pay an auto-electrician to handle it for you.
Naturally, some jobs are better suited to DIYers than others. A snorkel (or raised air intake) installation, for example, is one I’d usually say is best to pay a professional to install for you. Purely because by the time you invest a significant amount of money into hole saws and other tools required for the job (that you’ll only use once), there isn’t much money saved over paying for a professional installation at a workshop.
The best thing about installing a UHF radio at home, is you don’t need much more than a soldering iron, a few hours of time, and some basic hand tools – that if I think about it, every responsible four-wheel driver really should have in their vehicles toolkit anyway. Here are my top ten tips for DIY installation of a UHF radio into your four-wheel drive.

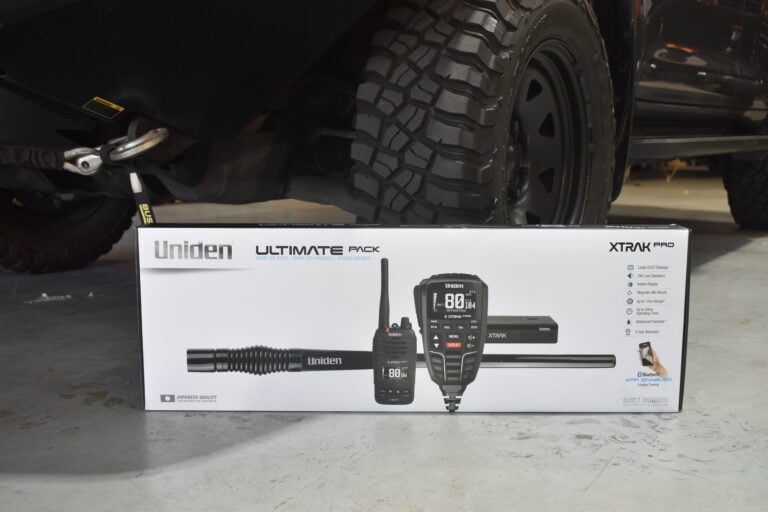
Decide if you want to have a permanently mounted UHF in your vehicle, or if perhaps a good quality handheld UHF is enough for your needs. In my opinion, and in my own vehicle, I choose to run both. I have installed the Uniden XTRAK 80 Pro kit for this reason, it came with everything I needed. Both from an installation point of view, which you can read about here, as well as quality product-wise – I can’t stand poor quality four-wheel drive accessories.
I now have a UHF mounted permanently in the vehicle, and a powerful 5W handheld UHF to take on walks or bike rides, as well as to use in technical off-road settings, where I need a spotter. Having a radio inside the vehicle, as well as a mobile unit is the ultimate in off-road communications.

This is exactly the reason we selected the same kit to install into my mate’s 150 Series Prado when he asked for some advice. As he had no communications equipment, I suggested he start from scratch and just invest in one kit that will have everything he needs – and will also last the test of time. I was very happy my buddy took my advice and went with the XTRAK 80 Pro Ultimate kit. And I got the job of showing him how to install it into the Prado, taking you along for the ride. Fun fact, Uniden originated in Japan and has been around since 1966.

The main advantage of buying a UHF kit is that it should include everything you need to get the job done. The next step after picking your new UHF kit up is really important. It’s something you really must do before beginning the installation. Unbox your UHF, and become familiar with everything that has been supplied in the kit.
Read. The. Instructions. Please. I can’t stress this enough. While we as humans tend to get started first and then rely on instructions, you’ll save yourself hassle by giving them a once over. Get the process started correctly the first time.

In this case, we want to hide the UHF unit as all the functions required live in the handpiece. Which is awesome. So you want to find a neat place to tuck it out of the way. This could mean finding somewhere under the dash for example, but in our case I decided to take things a little further for a super neat installation.
I watched a few videos online about how to remove the 150 Prado centre console (a very valuable resource). And decided to mount the UHF under the centre console. The removal process was a little daunting as some dash trim had to be removed also, but after watching the video I found online, I felt confident. This was somewhat involved, but would provide a very neat outcome for two reasons:

This is the most important step in the process. You can do the best installation in the world, but if the handpiece sits in the wrong spot, you’ll regret it every time you bang your knee or drop the handpiece. Take your time. Sit in the vehicle, and see where you can reasonably mount the handpiece. Also, if you are doing this job for someone else, get them to physically sit in the car, and trial-fit it to make sure they are happy.

In this case, with the Uniden kit, the handpiece mounting bracket is magnetic, which is just a fantastic idea. To secure it to the lower dash next to the driver’s left knee, simply peel off the coating on the back of the supplied magnetic mount, and push the sticky part where you want it to go. I like to clean this area first with Prepsol to help the process along. Then put pressure on the magnetic mount, so it sticks as it should. Do this right, and you basically have a permanent installation. This is why step five is so important to get right the first time.
There are two cable runs you’ll need to think of. Running the coaxial cable from the antenna to the UHF. And powering the UHF, with a positive + and a negative – connection. Let’s take a closer look at these steps in detail.

In this case, mounting the supplied 3.0dBi Uniden antenna (which is apparently the most popular in their range) was the easiest task of the installation. The 150 Prado in question had a bull bar with mounting tabs on the top loop. I first ran a step drill through the mounting tab to slightly increase the hole size (the paint was a little thick – that’s how little was required).
This is one step you can mess up, which is annoying. Take the nuts and washers off the base of the antenna and put them somewhere safe. Now, run the coaxial cable through the bull bar’s mounting tab and pull it all the way through.
The antenna will now be able to sit in the mounting tab. I also left the spacer puck on as I didn’t need the full thread length available. Take (in this order) the flat washer, the star washer then the nut. And feed them the length of the coaxial cable. Once these components have made it to the base of the antenna, screw them onto the thread of the antenna. Washer, star washer, then the nut. It’s not a big deal if you mess this up, it just means you’ll have to take it to bits – and nobody likes doing a job twice. Now you can run the coaxial cable.

This is another straight forward step if you know what to look for. Essentially, you need to get the coaxial cable into the cabin of the vehicle, to mate it to the new UHF. You want this to look like it was done from the factory, so take your time. You also want to avoid any sharp edges, or heat sources, so the coaxial cable isn’t damaged.

I like to cover the coaxial cable from the antenna to the firewall in corrugated split tubing for added protection. In the case of the 150 Prado (all 4x4s will be different) there are two rubber grommets on the passenger side firewall. I found the easiest one to access, and cut a tiny nipple off, and ran the coaxial cable through the firewall grommet. It’s not a tricky job at all, just take care to not damage any factory wiring. That wouldn’t be a fun time at all.

With the coaxial cable run to the UHF, secure it with cable ties to any secure point, that again isn’t near a sharp object, a heat source or close to anything that moves. Then, you simply need to attach the supplied fitting to the end of the cable and screw it into the UHF nice and securely. Simples!

There are a few options here. You could run a new cable from your vehicle’s start or auxiliary battery. Which is easy enough, just a bit messy.
You could tap into the vehicle’s factory fuse panel, and use an add-a-fuse on a port that is activated with the ignition on. This is my preferred method these days, and how I powered the UHF in my own FJ Cruiser.
In the case of this 150 Prado, I decided to tap into the 12V plug mounted on the centre console. This was super easy and provided the shortest and neatest cable run. In the 150 Prado, the green wire was + and the white with black -. This was tested with a test light to confirm. This will be different on every vehicle, so you will need to check for yourself.

I used some wire strippers to access each cable, soldered the cables to their corrrect wire, and tapped everything up with cloth electrical tape. The supplied cable in the Uniden kit we used came pre-assembled with fuses, so we’re now ready to test our new UFH.

With the ignition on, I held down the power button on the UHF handpiece for a few seconds, and guess what? It worked the first time. This is a success. Next, I grabbed the supplied 5W handheld UHF that came with our kit, and tested bth UHFs to see if everything worked, or to see if I’d created a cracking mess. Guess what… nailed it, our new UHF was working just as it should. Now it’s time to tidy up, put all the trim panels back where they belong and we’re ready to hit the tracks. Oh, and the most satisfying part… removing that protective sticker from the handpiece… so rewarding.