How to Check, Repack and Replace Wheel Bearings
Learn how to check wheel bearings for wear, inspect them correctly, repack them with fresh grease and know when it's time for replacement.
Published on: 15 July 2026
Advertisement
Wheel bearings are one of those components you rarely think about until something goes wrong. Whether you’re tackling remote tracks, towing a camper trailer, or simply driving to work, they’re responsible for allowing your wheels to rotate smoothly while supporting the weight of your vehicle.
Over time, wheel bearings can wear out, lose lubrication or become contaminated by water, dirt and dust. Left unchecked, they can overheat, cause handling issues and, in severe cases, fail completely. Fortunately, many serviceable wheel bearings can be inspected and maintained before they become a major problem.
In this guide, we’ll explain how to check wheel bearings for signs of wear, when they need repacking, how to replace them and why many modern 4WDs now use sealed hub bearings that require a different approach to maintenance.
Yes. Most trailer and serviceable 4WD wheel bearings can be inspected by lifting the wheel, checking for play, listening for noise while rotating the hub and looking for signs of grease leakage or overheating.
Serviceable bearings should be cleaned and repacked with fresh high-temperature bearing grease at the manufacturer’s recommended intervals, while sealed bearings generally require replacement when worn.
Wheel bearings usually give plenty of warning before they fail completely. If you notice any of the following symptoms, it’s worth inspecting them as soon as possible.
A worn wheel bearing often produces a low humming, rumbling or growling noise that becomes louder as vehicle speed increases. The sound may also change when cornering as the load shifts from one wheel to the other.
With the vehicle safely lifted, grasp the tyre at the top and bottom and gently rock it. Excessive movement can indicate a worn wheel bearing, although suspension or steering components may also be responsible, so further inspection may be needed.
Rotate the wheel by hand while it’s off the ground. A healthy bearing should feel smooth and quiet. Grinding, roughness or resistance can indicate worn or damaged bearings.
On serviceable wheel bearings, grease leaking past the hub seal may indicate a damaged seal or overfilled hub. If water, dirt or dust enters through a failed seal, bearing wear can accelerate quickly.
After a drive, carefully feel the wheel hub without touching hot brake components. If one hub is noticeably hotter than the others, excessive friction from a failing or incorrectly adjusted wheel bearing could be the cause.
Severely worn wheel bearings can contribute to steering vibration, instability or a vague feeling through the steering wheel. Because these symptoms can also be caused by tyres, suspension or wheel alignment issues, they should be investigated rather than assumed to be a bearing fault.

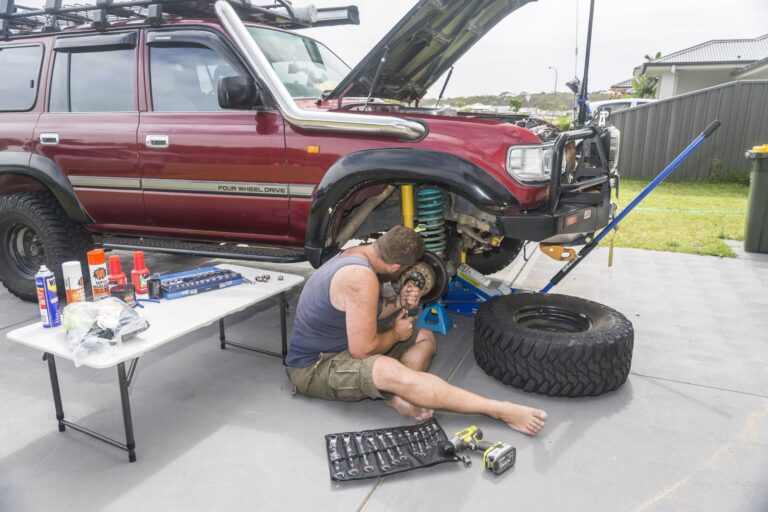
It’s pretty straightforward in the tool department (for an 80 Series LandCruiser, anyway):

Wheels and brakes come off first, and if we need to tell you how to do this, then you’re better off leaving the job to a mechanic! If you’re game and not bad on the spanners, once you’ve got the wheel and brakes off, you’ll want to pull off the outer locking hub.
It’s easiest to do this with the hub in ‘Free’ as it pulls the hub together, so it’s a nice tight part when you pull it out (not a hub hanging on the end of a spring threatening to break up faster than Sting and The Police). After the six 10mm bolts are out, this should just pull straight out.

Remove the circlip from around the end of the CV and undo the six 12mm nuts holding the manual hub on. Under the nuts you’ll find flat washers and cone washers.
Use a brass drift and tap the end of the studs to loosen the cone washers and pull them out – a light tap with the hammer on the side of the hub will loosen them enough to get them out, or you can get a tiny flat-blade screwdriver into the splits in the cone washers and pull them out. You can use a pair of screwdrivers to lever the hub off if it’s a little tight.
Next you’ll need to fold the tabs down on the lock washer to give access to the first wheel bearing nut. Once you’ve got the first nut off, you should be able to remove the lock washer and get access to the second wheel bearing nut.
Make sure you flatten out the lock washer at this point so you can reuse it if it’s still in good nick (my kit didn’t come with a new lock washer). Then go ahead and undo the final wheel bearing nut and remove it from the hub.
Now you’ve got the hub assembly off, give it a decent clean – cleaning out any grease and checking the seals for marks or obvious signs it’s been rubbing untrue. After cleaning the grease out of the hub assembly you’ll be able to see the wheel bearing’s cup and cones.

My bearings were in good nick, but the grease was closer to oil than grease, so I repacked them and retightened them to spec.
Essentially, you put some grease in the palm of your hand and push the bearing onto the grease so it forces the grease through the bearing. Keep adding grease, and pushing it through the bearing until it’s coming out the other side (the whole way round).
Should you need to replace the bearings you’ll have to knock the cups out of the hub assembly, knock the new ones in until they’re all the way home, and grease the cones up as outlined.

Once you’ve repacked everything it’s time to put it all back together. I’m not going to go into torque settings or ‘feeling the bearing preload’ as it’s different across the different 4X4s out there. Suffice to say, you’ll find it in the workshop manual or you can ask Google.
From there it is just a matter of completely reassembling things opposite to the way you’ve taken it all apart… and then you’re done. Oh, make sure you check for play in the wheel when it’s all back together.
There isn’t a one-size-fits-all answer because the correct adjustment depends on the vehicle and the type of wheel bearing. Always follow the manufacturer’s workshop manual for the specified preload or torque setting.
For traditional serviceable tapered roller bearings, the general process is to tighten the axle nut while rotating the hub to seat the bearings, then back the nut off before tightening it to the manufacturer’s specified preload. This removes excess play without placing too much pressure on the bearings.
Wheel bearings that are adjusted too tightly can overheat, wear prematurely and, in extreme cases, seize. If they’re left too loose, the wheel may develop excessive play, leading to poor handling, uneven tyre wear and potential bearing damage.
After adjustment, the hub should rotate freely and smoothly with no roughness or binding, while only the amount of free play specified by the manufacturer should be present.
It depends on the vehicle. Many older 4WDs and trailers use traditional serviceable tapered roller bearings, which require periodic cleaning, inspection and repacking with fresh grease. These bearings can often be maintained at home with basic tools and the correct workshop procedures.
However, many modern 4WDs now use sealed wheel bearing hub assemblies, particularly on the front axle of independent front suspension (IFS) vehicles such as the Ford Ranger, Toyota HiLux, Isuzu D-MAX, Mazda BT-50 and Ford Everest. These sealed units are lubricated for life and cannot be repacked. Once they become noisy, develop excessive play or fail inspection, the entire hub assembly is typically replaced.
Some vehicles use a combination of both systems. For example, the front axle may have sealed hub bearings while the rear axle uses a different bearing arrangement. If you’re unsure which type your vehicle has, consult the owner’s manual or workshop manual before beginning any maintenance.
Knowing whether your vehicle has serviceable or sealed wheel bearings is important, as attempting to dismantle a sealed hub assembly can damage it beyond repair.

Wheel bearing maintenance isn’t particularly difficult, but a few common mistakes can significantly reduce bearing life or lead to premature failure.
Not all bearing greases are compatible. Mixing different grease types can reduce lubrication performance or cause the grease to break down. Whenever possible, completely remove the old grease before repacking with a quality high-temperature wheel bearing grease.
Hub seals are inexpensive and are designed to keep water, dust and dirt out of the bearings. Reusing damaged or worn seals increases the risk of contamination, so it’s good practice to replace them whenever the hub is dismantled.
Wheel bearings that are adjusted too tightly create excessive friction and heat, accelerating wear and potentially causing bearing failure. Always follow the manufacturer’s preload or torque specifications.
Excessive free play allows the hub to move more than intended, which can affect handling, increase tyre wear and place additional stress on the bearings and surrounding components.
Even small amounts of dirt, sand or metal particles can dramatically shorten bearing life. Always work in a clean environment and avoid allowing contaminants to contact freshly cleaned bearings or grease.
A slight humming noise or a small amount of wheel play is much easier and cheaper to fix than a catastrophic bearing failure. Investigating symptoms early can help prevent more extensive damage and reduce the risk of being stranded.

Serviceable wheel bearings should be inspected and repacked according to your vehicle manufacturer’s maintenance schedule. If your vehicle is regularly used for water crossings, beach driving, heavy towing or dusty conditions, more frequent servicing may be required.
It’s not recommended. A noisy wheel bearing is usually a sign of wear or damage and will typically deteriorate over time. Continuing to drive may lead to further damage or, in severe cases, bearing failure.
Common signs include a humming or growling noise that increases with speed, excessive wheel play, roughness when the wheel is rotated by hand, grease leaks around the hub and an unusually hot wheel hub after driving.
Yes. Overfilling the hub can force grease past the seals, attract dirt and create unnecessary heat. Apply grease according to the manufacturer’s recommendations rather than packing every available space.
There’s no fixed lifespan. Wheel bearings can last well over 150,000 kilometres under normal conditions, but water ingress, poor adjustment, contamination, heavy towing and off-road use can significantly shorten their life.
Yes. Deep water crossings can allow water to enter serviceable wheel bearings if the seals are worn or damaged, washing away grease and leading to corrosion. If your vehicle has been submerged beyond the hubs or regularly tackles water crossings, it’s worth inspecting the bearings as part of your post-trip maintenance routine.
Wheel bearings might not be the most glamorous part of your 4WD, but they’re critical to both safety and reliability. Whether your vehicle uses serviceable bearings that need periodic repacking or sealed hub assemblies that require replacement when worn, catching problems early can save you from expensive repairs and potentially dangerous failures.
By checking for noise, excessive play, grease leaks and overheating as part of your regular maintenance routine, you’ll give yourself the best chance of spotting problems before they leave you stranded. If you’re unsure about a bearing’s condition or the correct adjustment procedure, it’s always worth referring to the manufacturer’s workshop manual or seeking advice from a qualified mechanic.
Words by Wes Whitworth and Jessica Palmer.