Unsealed 4X4 garage: DIY 12V Fridge beer tap installation
Possibly the most glorious 4X4 modification since the diff lock Words by Pat Callinan, Images by Matt Ryan It started out as a gag. “Hey, let’s see if we can pop some beer taps into the fridge!” I’d seen them…
Possibly the most glorious 4X4 modification since the diff lock
Words by Pat Callinan, Images by Matt Ryan
It started out as a gag. “Hey, let’s see if we can pop some beer taps into the fridge!” I’d seen them tapped into eskies, but could it be done with an actual 4X4 fridge? You bet it can. And that gag rapidly turned into reality – a beautiful, frothy, frosty reality…
So Why Do It? Four-wheel drivers know that drinks leak. Cans puncture with those little pin-prick leaks, and have to be carefully packed in beer coolers if they are to survive a desert crossing. And twist tops leak, gradually winding themselves loose over the rigours of outback tracks. And glass? Forget about it. It breaks, it smashes, and it’s bulky. In fact, all alcoholic packaging, be it from wine, spirits or beer, creates lots of rubbish – stinking rubbish that we have to lug back into town to the local tip.
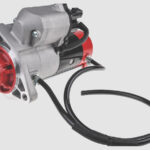
Kegs are Cool And that’s where 5-litre kegs are cool. Like their big brothers, they’re made of stainless steel. They’re robust, and can sit on the bottom of your fridge, with all sorts of stuff packed on and around them. Powering them is simpler than I thought. A simple little carbon-dioxide canister (I grabbed mine from the local bike shop) gets the beer flowing – in fact, it will power about 15-20 litres of poured beer. You set the regulator low (at around 5psi), and then wind it up to around 12psi, which seems to be a good pouring pressure. But tinker with it until you get it right.
All Killer, No Filler You can put just about any liquid you like into your kegs, from espresso martinis, to bottled beer, to craft beer from your favourite local microbrewery. I did the latter, brewing my own beer at The Beer Shed in Leumeah. It’s a tad cheaper than your mass produced beers, but tastes a whole lot better. That taste probably comes from the fact that it’s not pasteurised (heated) like your big brewery beers.
The only downside I can see is the fact that you need to keep your kegs refrigerated. But if you run out of lager on your travels, you could just fill your kegs up at the local pub, or even empty a bunch of longnecks in before you leave town. Obviously not all of you guys live in Sydney, so you can also fill your kegs at Growler stations around Australia. Here’s where you can find them: beeradvisor.com.au
The Installation I used an ARB 78-litre fridge, and spoke to the ARB engineers who let me know where I could drill, so as to avoid the cooling elements. Be careful with this step, as the last thing you want to do is kill your thousand-dollar fridge. I bought the set-up from iKegger, who do this stuff everyday. So they supplied the whole kit – kegs, lines, connectors, regulator and taps. Incidentally, because the ARB has so much insulation, we needed much deeper taps than you might think. And our taps had a flow control built-in, which is handy for travel too, because if your tap gets knocked in transit, your beer won’t flow if the flow control is set to ‘off’. After drilling the holes, it’s dead-easy to plumb things up. The kegs simply have gas ‘in’ beer ‘out’ fittings – you can’t really go wrong.
The Lasting Impression This is one accessory I absolutely love. The beer tastes fantastic, and it creates no rubbish while you’re on the road. Not to mention the bragging rights are pretty cool.
Big Drunken Thanks! A big thanks to iKegger and The Beer Shed for their advice and assistance in the set-up.
Unsealed 4X4 delivers honest 4WD advice, gear reviews, and travel guides crafted from real Australian adventures. Since 2014, we've tested the gear, driven the tracks, and learned what works - so you can hit the tracks safely.