Dynamat: Is this product music to your ears, or a sticky waste of time?
If you’re one of the unlucky ones where your 4X4’s OEM sound system is like a mash of noises echoing out of the toilet, then you’re not alone. Ours too was an absolute shocker before we decided to upgrade not…
If you’re one of the unlucky ones where your 4X4’s OEM sound system is like a mash of noises echoing out of the toilet, then you’re not alone. Ours too was an absolute shocker before we decided to upgrade not long ago. But changing the sound system was only part of the job. The acoustics in our vehicle could easily be compared to sitting in a tin can as there was little sound dampening throughout the cab.
With the decision made to carry out some cabin mods, it wasn’t long before we were introduced to some sound-deadening options and products which got our attention. If any time was going to be the right time for this type of job, it was now. With a little research we found a few different types and applications on the market – but we chose to go with one of the major players: Dynamat.
What is it?
With the roof all finished it was time to run the cabling for the new overhead console
Dynamat is a light-weight butyl (synthetic) rubber which has been bonded to aluminium sheeting that gets applied to metal panels and acts as a sound dampener. There’s a couple of Dynamat solutions available – the thicker version is Dynamat Xtreme which is bonded to 4mm aluminium sheeting; or there’s Dynamat Superlite which is a 30% lighter version bonded to 2mm aluminium sheeting.
The sheets come in a range of kits so there are packs for jobs of all sizes. As we wanted the maximum sound dampening available for our dual cab, we chose a couple of the Xtreme bulk packs. We planned to gut the cabin to sound deaden it while doing some other interior mods. Each bulk pack contains nine sheets and covers around 1.2 square metres.
How it goes on?
The Dynamat was easy to cut by using a sharp knife or scissors
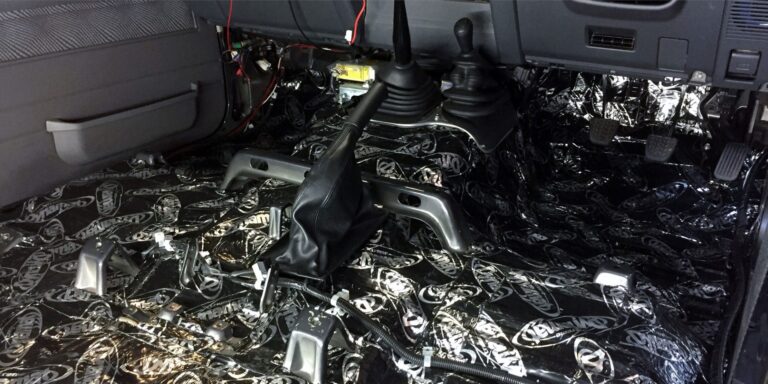
As eager as we were to get the stuff on, we started by doing a bit of prep work and cleaned the metal surfaces with a mild alcohol product to maximise adhesiveness. We took a methodical approach to applying the Dynamat because it sticks like the proverbial to a blanket once the waxed backing sheet is removed. It helps if you know where it’s going before removing the backing; and we ended up making templates for areas that were a bit fiddly.
It’s easy enough to cut the sheets to size using a sharp knife or scissors. Applying the material was simply a matter of starting in one corner of the Dynamat sheet to begin removing the backing before fitting it to the panel. Although the instructions in the box suggest using a small roller to remove air pockets for better adhesive coverage, that worked perfectly for flat surfaces but was useless anywhere there was a contour (such as the floor pan and pillars). We improvised and used whatever was lying around the shed to help apply the Dynamat. Simple things like a tennis ball, a spoon, or even the back of screwdriver all worked a treat and got the material into all the nooks and crannies. We then continued, repeating the process on the next piece by butting the two pieces together; and we were away. We found that having an extra set of hands was valuable to assist with lining the sheets up in position before sticking them on – for areas such as the roof, side pieces and doors.
How much do you need?
A box of the bulk pack weighs in at 16kg
This really came down to who we talked to! Some said we only needed 70% of the panels covered, whereas others we spoke to suggested covering them completely. When it came to the doors, we took the advice from sound acoustic specialists who recommended we cover both the door inners and outers – which suited us as we needed to remove the door trims to fit new door speakers anyway. This area was probably the fiddliest, especially when trying to stick the material on the outer door. We found that pre-cutting the Dynamat to the correct size helped… so that none of the holes that needed to remain uncovered got blocked. It was also important not to interfere with any door cables or the door latches, before carefully re-fitting the plastic door seals once the job was finished. Here we used some new sealer to get the door seals sticking properly again.
When around 50% was covered we noticed a change in the cabin acoustics – so even at that point we felt we’d done the right thing. But we knew two boxes wasn’t quite going to be enough, so we hit the shops to get another box and decided we might as well cover the lot.
Pros/Cons
It’s clear how little sound deadener is applied during the manufacture of our modelThe finished job has been well worth the effort
It’s hard to exactly compare the before and after because of the new sound system (and no doubt that alone has improved things tenfold). But even without the stereo playing, we both agree that the tinny sound has long gone. In a touring vehicle where we can spend long periods of time driving, we’re also stoked that the road noise no longer transfers through the cab. Now we don’t need to lip-read because we can actually hear each other speaking (although some may prefer it the other way).
Applying Dynamat is the type of thing you can do in stages if you’re not sure exactly how much to cover… especially when it’s not the cheapest sound dampener going around.
Our three boxes cost about $600, but you might get away with it cheaper (and lighter) if you use a thinner version and don’t cover everything. Our project added around 36kg in weight. It took us three days by the time we pulled everything out, applied the Dynamat, did a couple of other jobs, and put everything back together.
Now that it’s all done and dusted, the overall improvement in sound has been sensational and dust ingress has been reduced thanks to having everything tightly sealed. For our money, we’d do it all again in a sound beat.
Unsealed 4X4 delivers honest 4WD advice, gear reviews, and travel guides crafted from real Australian adventures. Since 2014, we've tested the gear, driven the tracks, and learned what works - so you can hit the tracks safely.